Save an email’s printable contents as PDF, then create JPEG page images for a visual copy.
To create JPEG pictures of an email, first save its printable contents as PDF, then convert the PDF pages to JPG. This gives you a visual copy. It is different from preserving the original email file with its message structure and attachments.
Save an Outlook message as PDF
On a supported Windows setup, open the message in Outlook, choose its Print command and select Microsoft Print to PDF. Save the output to a local folder. The controls differ between classic, new and web Outlook; see Microsoft’s message-saving guide.
Open the saved PDF before converting it. Confirm which message, headers and quoted replies were included. Keep the original email if you need to retain more than its printed appearance.
Print the required Gmail message
In Gmail on a computer, open the message and use its More > Print command. Use Print all only when you intend to include the conversation. Follow the available PDF-saving option in your print dialog. See Google’s Gmail printing instructions.
If printing is unavailable because the sender restricted it, ask for an appropriate copy. Do not assume that a visual conversion bypasses the message’s access controls.
Convert the saved PDF to JPG
LeoPDFree for Windows provides free local PDF-to-image conversion without uploading your file for processing. Choose that conversion, add the saved PDF, select JPG and review the settings shown by your installed version. Convert and open the output images.
See our PDF-to-image guide. Supported image conversion in LeoPDF store editions also runs locally; paid cloud OCR processing applies to conversion to Word or Excel instead.
Confirm the intended message and reply range were captured.
Check page count, order and small text.
Look for missing inline pictures or clipped content.
Check whether attachments need to be saved separately.
The PDF-to-JPG step is local, but accessing a webmail service remains an online activity. These are separate stages of the workflow.
A screenshot may be sufficient for a small visible area, but it can omit content outside the screen. A JPEG copy should not be treated as a complete email archive or a replacement for the original message when its full contents matter.
Questions about LeoPDF?
Contact xuehui@leopdf.com with your platform, app version and a description of your question.
Create a PDF from JPEG images while reviewing source dimensions, page layout and the resulting file size.
Putting JPEG images into a PDF does not guarantee a smaller file. The output depends on the source images, conversion settings and the pages you include. Start with a copy of the photos, decide how the PDF will be used and compare the result before discarding anything.
Prepare the images you need
Remove accidental duplicates from the working selection and put the required pictures in a clear order. Keep the original photos separately. If the PDF only needs modest display dimensions, consider whether smaller copies would be sufficient before converting.
Resizing or recompressing can reduce useful detail, especially in small text photographed on a page. Inspect a sample at the intended reading size rather than selecting the smallest possible file without checking it.
Convert JPEG to PDF with LeoPDFree
LeoPDFree provides supported image-to-PDF conversion on Windows for free. All its supported conversion and file-processing work runs locally on your computer without uploading files for processing.
Choose image-to-PDF conversion in your installed app.
Add the JPEG images you intend to include.
Review the order and the page or output options offered by your version.
Create the PDF and save it with a distinct filename.
Open the result and compare it with the source images.
Compare the finished PDF with the total size of the selected source files. Count the pages and check for duplicate images. If your app offers image quality or resolution controls, compare another sample output rather than assuming that a particular setting is available in every edition.
If the PDF is still larger than you can send, go back to the image copies and reconsider their dimensions or the number of pages. Avoid repeatedly recompressing your only originals. A file that meets an upload limit is not useful if the recipient cannot read it.
Review the result
Check page order, orientation and any unwanted borders or cropping.
Zoom in on small writing, labels and important details.
Open the PDF in the application the recipient will use.
Keep both the original images and the finished PDF.
Turning photos into a PDF does not automatically recognize their words or make them editable. Image-to-PDF conversion and OCR are different operations. Do not treat a smaller output as proof that the document retained every original detail.
Questions about LeoPDF?
Contact xuehui@leopdf.com with your platform, app version and a description of your question.
Convert HEIC photos to PDF with Preview on Mac or two online services, and review upload requirements and the saved image.
When a recipient needs a PDF instead of a HEIC photo, choose a tool that explicitly accepts HEIC input. Renaming the file extension does not convert the image. These three methods offer a local Mac workflow and two browser-based alternatives; their processing and account conditions differ.
1. Export with Preview on Mac
Open the HEIC photo in Preview, choose File > Export, select PDF as the format, and save a new file. Apple describes exporting images in the Preview user guide. This operation does not require uploading the photograph to an online converter.
Reopen the PDF and compare its orientation and visible detail with the photo. Keep the HEIC original instead of overwriting it, particularly if you may need a different export later.
2. Use Adobe’s online HEIC converter
Adobe offers a dedicated HEIC-to-PDF tool. Select the photograph, complete the conversion and download the PDF. Check the current access, account and file conditions before starting rather than assuming that every use is unrestricted.
This is an online conversion: the photograph is uploaded to Adobe for processing. Review the service terms and whether that upload fits the photo’s contents before using this method for personal or workplace material.
3. Use CloudConvert
CloudConvert’s HEIC-to-PDF page provides another online route. Select the source, confirm PDF as the output, start the conversion and download the completed file. Review any settings presented for your task and check the service’s current usage conditions.
As with other server-based converters, decide whether uploading is acceptable before selecting the photograph. Do not assume that the absence of a desktop installation means the image stays on your device.
Check the converted photograph
Verify that the entire intended picture is visible.
Check rotation, borders and unexpected cropping.
Inspect small details at a useful zoom.
Check the saved file size if the recipient imposes a limit.
Retain the original and give the PDF a clear filename.
A PDF copy should not automatically be treated as a complete archive of every property associated with the original photo. If the source contains more than the still image you need to share, keep it separately.
When the goal is readable text
A photograph of a page remains an image unless a separate recognition step is performed. Simply saving it as PDF does not guarantee searchable text, an editable Word file or a usable spreadsheet. Compare recognized text with the source whenever you use OCR.
For related topics, see the PDF guides. Choose a method by its explicit input support and your document-handling requirements rather than assuming that every image converter accepts HEIC.
Questions about LeoPDF?
Contact xuehui@leopdf.com with your platform, app version and a description of your question.
doPDF’s print-to-PDF workflow, free versus paid edition checks and practical output verification, without unverified speed, security or file-size claims.
Among all of the PDF tools that are out there, doPDF is a little-known option. Its purpose is pretty basic – to turn files into a printable format with ease. Although not the simplest option you could use for this task, it's not ineffective by any means and may be worth checking out.
There are some questions surrounding the tool though. Such as, "Is this the best tool I can use for creating PDF files?" and "are there any better tools out there?", both are reasonable questions. For that reason, our doPDF review is going to examine this tool and consider the possibility of using alternatives.
Part 1. doPDF In-depth Review
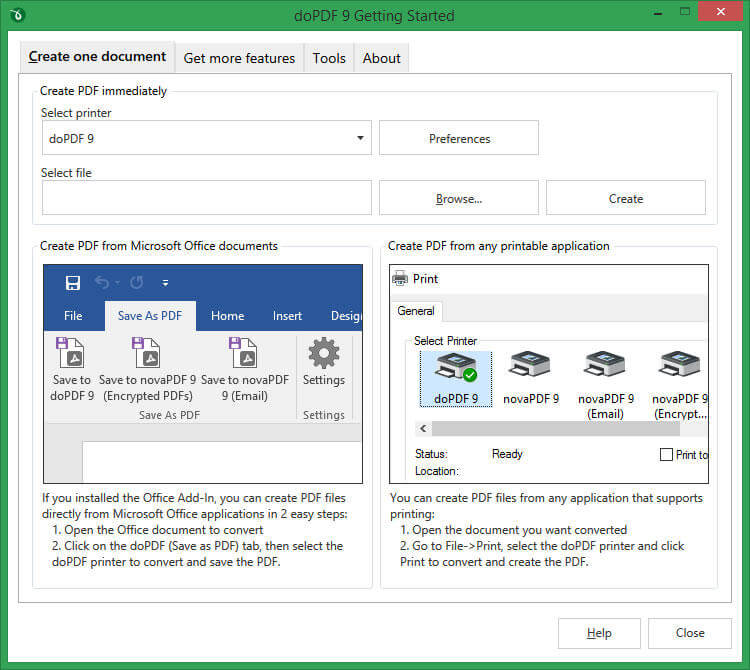
As we've already mentioned, doPDF creates PDF files, and it does this in a unique and slightly complex way. When you install it, doPDF is installed on your computer as a virtual PDF printer. What does this mean? Basically, it is recognised as being a printer but without having the printer hardware. So, when a file is sent to the virtual printer, instead of being printed it is saved as PDF.
PDF printer interface.
1. Features of doPDF
This seems simple enough, but it can get quite complicated for the non-tech savvy users. Some of the main features that doPDF includes are:
Can turn most document formats into a printable PDF (including Word/DOC/DOCX, HTML, Excel, PowerPoint, and other files)
Installs as a Microsoft Word add-on which makes it easy to access
Uses very little computer resources so that it doesn't affect computer performance
Allows users to save the final PDF file in different sizes (e.g. A4, A5, etc)
Graphics that are in the document can be made smaller or bigger
Whilst these features don't scream impressive, there's no way to deny that doPDF is effective in doing its purpose. A particularly interesting feature is that it comes as an add-on rather than a standalone tool.
Setting aside the positives, it would be wrong to not address the glaring negatives that come with this tool.
2. Cons of doPDF
Doesn't let you install in any destination, it can only install in the "C:\Program Files\" directory
Overall this is a very basic piece of software with no advanced or technical features for PDF management
3. Is doPDF Safe?
One concern a lot of users have when it comes to using new tools or software is whether or not it's safe to use. Because there's a risk of downloading viruses and malware, this is more than understandable.
Download the installer from the publisher and review the installation options before setting up the virtual printer.
4. Performance
The first thing to note regarding the performance of doPDF is that this is a free tool, but the same developers offer a paid version too. This paid version is called novaPDF Professional and it gives us access to a wider range of features. But there are some other areas of performance we need to focus on:
2. PDF Security. Unlike other PDF tools, you cannot handle the file's security in any way (e.g. by adding a password for extra protection).
Part 2. Top 2 Alternatives to doPDF
If we move on from doPDF and focus our attention on the different tools you could use, there are two tools that we'd suggest. Below we've given you a breakdown of the top 2 alternatives to doPDF.
1. LeoPDFree for local PDF tasks
LeoPDFree is the free Windows edition. Its supported conversions, merging, splitting, page organization and compression run locally on your computer without uploading files for processing. PDF-to-Word and PDF-to-Excel conversion do not include OCR.
LeoPDF app store editions provide paid cloud Word and Excel conversion with OCR for PDFs, images and scans. Conversion files are deleted when processing completes. Other supported conversion and file-processing tasks run locally on your device.
Choose the edition and platform that fits your document. For creating a PDF from an editable Word or Excel document, use that document application’s PDF export or a PDF printer. LeoPDF does not provide Word/Excel-to-PDF, signing, form filling, direct PDF editing, page or embedded-image extraction, or encryption/decryption.
2. PrimoPDF
PDF printer interface.
PrimoPDF is similar to doPDF in the sense that it lets users create PDFs out of regular documents, but this is a standalone program whereas doPDF is a Microsoft Word add-on.
Quickly converts documents from various formats into PDF
PDF password protection can be managed
PrimoPDF is a free PDF tool
Cons of PrimoPDF
Some users report that a document's images are distorted after using PrimoPDF
Doesn't have a lot of features
For extra features for PDF management, users must buy Nitro Pro
PDF2Go tools, plan checks and upload-handling considerations, with a practical output checklist and clear boundaries for local LeoPDF alternatives.
PDF2Go tools.
PDF toolkits are essential for many workers who handle documents on a daily basis. With a toolkit, you can do tasks such as editing a PDF, extracting pages from a PDF to create a new document, and even convert a PDF to a completely different format.
Better yet, there's no shortage of PDF tools out there and one which catches many users' attention is PDF2Go. For users who want nothing but the best, go ahead and read our review. We've taken the liberty to highlight the main features PDF2Go offers, its weaknesses, and what alternatives are out there.
Part 1. PDF2Go Full Review
Don't know what kind of tool PDF2Go is? This is an online toolkit which acts as a PDF editor, convertor, and many other things. It includes a diverse collection of PDF tools that make it appear to be incredibly helpful for lots of document tasks. Here is a quick rundown of the features which stood out the most to us:
Edit a PDF document without the original file (add images, edit text, etc)
Convert PDFs to Word, JPG, and many other file formats
Repair damaged or corrupt PDF files that won't open
Rotate scanned PDF pages that have been uploaded to the computer the wrong way
Files can be imported to PDF2Go from Google Drive and Dropbox
Free access has processing limits; paid features and higher allowances are separate options.
All of its main PDF tools can be accessed online
There's no way around the fact that PDF2Go has a lot of use to the typical office worker, and these features only show a fraction of how useful it is.
1. Performance
Try the operation with a representative document and check the output. For conversion, compare text and table structure; for compression, compare readability and file size.
There are no installations needed, it is purely an online toolkit
Files are processed efficiently and high-quality documents are produced
Read the service’s file-handling information for the task you use. Processing a document, saving it to account storage and sharing a download link are separate actions.
Since this toolkit is online, it can be accessed from anywhere without the need to download
Formats such as DOC and DOCX are interchangeable (both can be converted), and this applies to similar formats like PowerPoint and Excel
2. Pricing and Plans
For the most part, PDF2Go is a free online PDF toolkit, but users do have the option to upgrade to have a Premium account. Below is a breakdown of the different account plans.
Unregistered Account (free)
Access to all tools, but users will have big limits on how large the file size they upload is and the number of files that can be converted simultaneously.
Registered Account (free). Access to all tools and requires users to sign up with their email address and create an account. There are still limits on the file size and how many files can be converted, although the limits aren't as big as an unregistered account.
Free access and paid plans have different processing allowances. Compare the available features, file limits and billing terms on the publisher’s pricing page before choosing a plan.
3. Top Features of PDF2Go
Multiple PDF Converting Options
When it comes to converting to and from a PDF, you will get multiple options. For example, you can convert a PDF to Word and Word to PDF, PDF to JPG and JPG to PDF, PDF to PowerPoint and PowerPoint to PDF, PDF to Excel and Excel to PDF, PDF to Text, EPUB to PDF, and finally DJUV to PDF. These are the converting options that are available.
Very Simple to Use
If you need a no-fuss PDF editing or converting tool, you can definitely try PDF2Go. This tool will let you edit, compress, merge, protect, split, unlock, sort, and delete, change page size, rotate repair, and more. The number of editing tools PDF2Go has is quite impressive. All you need to do is choose the right tool, upload your file, make the necessary changes, wait for a few seconds for the changes to complete, and finally hit the download option to download your copy.
A Safe PDF Editing and Converting Tool
4. Pros of PDF2Go
+ This tool allows you to add and edit text, highlight text, add comments, insert shapes, arrows, and lines.
+ You can merge, split, and even rotate PDFs.
+ PDF2Go allows you to password-protect a PDF and even unlock password-protected PDF with ease.
+ If you want, you can convert PDF to different formats.
+ Compressing PDF to a smaller size is possible.
+ All the converted or edited PDF will be free of watermarks.
+ The converted and edited files are of good quality.
5. Cons
The last part of our PDF2Go review is going to focus on the weaknesses of the toolkit.
PDF2Go has file limits for users who aren't paid subscribers
Free users will experience website ads
An internet connection is required to use PDF2Go
Because of broadbands limits, large documents can't be processed by PDF2Go
Part 2. Alternatives to PDF2Go
Perhaps PDF2Go wasn't what you expected it to be and if that's the case, don't hesitate to look into one of the alternatives we've researched for you below.
1. LeoPDFree for local PDF tasks
LeoPDFree is the free Windows edition. Its supported conversions, merging, splitting, page organization and compression run locally on your computer without uploading files for processing. PDF-to-Word and PDF-to-Excel conversion do not include OCR.
LeoPDF app store editions provide paid cloud Word and Excel conversion with OCR for PDFs, images and scans. Conversion files are deleted when processing completes. Other supported conversion and file-processing tasks run locally on your device.
Choose the edition and platform that fits your document. For creating a PDF from an editable Word or Excel document, use that document application’s PDF export or a PDF printer. LeoPDF does not provide Word/Excel-to-PDF, signing, form filling, direct PDF editing, page or embedded-image extraction, or encryption/decryption.
2. iLovePDF
iLovePDF provides online PDF tools and a desktop application. Compare free access with the paid plans for the operations you need.
Convert multiple formats to and from PDF
Add page numbers to each page in a PDF document
Repair corrupt or damaged PDF files that are unopenable
Reorganise the PDF pages to the correct order
Desktop application can be downloaded and used offline
For more details about iLovePDF, you may like: iLovePDF Review
3. PDF Pro
Just like PDF2Go, PDF Pro is an online PDF editor and converter tool as well. Plus, it is free of cost. If you want to do some simple editing or converting work, you can think of trying PDF Pro as well. It can let you create and review PDF, sign or make the PDF password protected, edit PDFs, split or rotate, add texts, and finally convert them into multiple formats.
Top Features
Edit PDF and add text.
Create new PDF files easily.
You can add a signature, insert images, shapes, and symbols.
Highlight or erase a text, compress a PDF, watermark PDF, merge, extract, and split PDFs.
Batch PDF file creation is possible.
Works very fast.
These are some of the features that you can avail of even without registering to PDF Pro online tool.
Is PDF2Go Safe to Use?
PDF2Go is an online tool that means you don’t need to download the software on your computer. You will have to upload the document on the online tool and then start editing the PDF. This is what concerns most of the users. Safety is always one of the top priorities before uploading a file on a completely unknown or new tool. But, PDF2Go has done a good job in setting everyone free from the worries.
As an owner of the document, only you will reserve the rights of the ownership.
Compare four TIFF-to-PDF workflows, including local applications and an online service, and check every page before sharing.
Converting a TIFF image to PDF can make it easier to share, but first check whether the TIFF contains one image or several pages. A preview of the first image does not establish that every page will reach the output. Keep the source and compare the completed PDF before sending it.
1. Export with Preview on Mac
Open the TIFF in Preview, choose File > Export, select PDF as the format, and save a separate copy. Apple documents this workflow in its Preview export guide. Preview is built into macOS and this operation does not require an online converter.
For a multi-page source, inspect the available thumbnails and compare the output page count. If your chosen export does not include every required page, use a workflow that does; do not assume that a readable first page means the whole TIFF was converted.
2. Lay out an image in LibreOffice
For a single TIFF image, create a Writer document and use Insert > Image. Adjust the page and image placement, then use PDF export to save the document. LibreOffice is a free installed alternative when you want control over the surrounding page.
This is a page-layout workflow, not a promise that inserting a multi-page TIFF automatically imports every frame. Check what was actually inserted.
3. Use Adobe’s online image converter
Adobe’s online image-to-PDF tool accepts TIFF as well as other listed image formats. Select the image, complete the conversion and download the PDF. Check the current free-use and sign-in conditions before starting.
This method uploads the image to Adobe. Use it only when that processing arrangement fits the document; it is different from the local options above.
4. Use Icecream PDF Converter
The official Icecream converter page lists TIFF input for creating PDFs and describes local processing. Choose conversion to PDF, add the image, review the available layout settings and save the result. The vendor offers a free version with restrictions, so verify that your task fits those conditions.
Check the finished file
Compare the source and output page counts.
Inspect orientation, margins and small details.
Confirm that no required image has been cropped or omitted.
Keep the original TIFF separately.
Wrapping a scanned image in a PDF does not by itself recognize its text. Choose OCR separately if searchable or editable text is needed. See the PDF guides for related conversion topics.
Questions about LeoPDF?
Contact xuehui@leopdf.com with your platform, app version and a description of your question.
Save a selected PDF page with browser, reader or Mac print workflows, and understand how paid extraction differs.
When you need one page rather than the whole PDF, save a separate copy and check that it contains only the intended page. Page extraction and printing a page to a new PDF can produce different results, especially for forms, links and signatures.
Save One Specific Page of a PDF File in Adobe Reader
A reader can print a selected page to a separate PDF when a suitable PDF printer is available. The following reader workflow is for Windows.
Step 1. Launch Adobe Reader and open the PDF you want to extract pages from.
Step 2. At the top-left of the window click “File” and then “Print”.
Step 3. Select the “Miscrosoft Print to PDF” format from the Printer list.
Step 4. Under “Pages to Pages”, check the “Pages” option and type whatever the page number is.
Step 5. Click “Print” at the bottom-right and enter a file name and save folder, before finally clicking “Save”.
Unlike the previous Adobe Acrobat Reader method, this is a free feature to use. Although you don’t need this Adobe program to access PDFs, it’s the random but helpful features like this that come in handy every once in a while that makes it worth having around.
How to Save One Page of a PDF in Google Chrome?
An unofficial way for saving one page of a PDF can be done with an internet browser. Here are steps to do so with Google Chrome.
Step 1. Right-click on the PDF file, hover over “Open with” and select “Google Chrome”.
Step 2. Press the CTRL + P keyboard shortcut or click the “Print” icon.
Step 3. Next to the “Destination” setting click on “Change…” and select “Save as PDF”.
Step 4. Next to “Pages”, switch the selection from “All” and type the page number you want to save.
Step 5. Press the “Save” button and select the save destination folder.
Microsoft Edge
Step 1. Right-click on the PDF and hover on “Open with”, then click “Microsoft Edge”.
Step 2 . Use the CTRL + P keyboard shortcut to view the Print menu.
Step 3 . Click on the “Printer” option and from this list choose “Microsoft Print to PDF”.
Step 4 . For the “Pages” option, choose “Page Range” and enter the number of the page to have saved.
Step 5. After you press the “Print” button you can choose the folder to save the PDF page in.
Saving One Page from a PDF on Mac
For Mac computer users, the built-in Preview application includes a feature to save one page of a PDF that can extract several pages at once too.
Step 1. Open the PDF document in the Preview app.
Step 2. At the top of the screen click the thumbnail icon which will display the PDF’s pages.
Step 3. Select the page you want to extract. Alternatively, to select multiple pages, click and drag them so that they are grouped together, then hold the Shift key when you click the first and last pages.
Step 4. Now go to “File > Print” and for the page range, choose “Selected Pages”.
Step 5. Click PDF at the bottom-left and from the drop-down menu, click “Save as PDF…”.
Step 6. Enter a name for the new PDF and a save folder, and click Save.
This is a quick way for Mac users to discover how to save one page of a PDF Mac and is close to effortless.
When a paid extraction feature is appropriate
Acrobat’s Organize Pages extraction is a separate workflow from printing a page through a free reader. Check whether your Acrobat edition includes it. Open Organize Pages, select the required page and use Extract; save a new document and verify its contents. Follow Adobe’s extraction instructions for the installed edition.
Check the saved page
Open the result, verify the page and inspect any required fields, links and signatures. Printing can change document behavior. Keep the original file. LeoPDFree does not provide the page-extraction operation described here; use a tool that explicitly offers it.
Questions about your LeoPDF edition?
Contact xuehui@leopdf.com with your platform, app version and the task you need.
Compare three online PDF-flattening options with free access, and verify form values and readability without treating flattening as tamper-proof protection.
Flattening can turn interactive elements, such as completed form fields, into page content. Some tools also offer whole-page image output, which has different consequences. Choose the intended operation before starting, keep the original, and review the saved copy. These three online options advertise free access, subject to their current conditions.
1. Sejda’s flattening tool
Sejda describes flattening options that include form fields and whole-page image output. Upload the PDF, select the appropriate mode and download the result. Check current file and free-use restrictions before starting.
Whole-page image output can affect selectable text and image detail. Choose it only if that result fits your task, and compare the saved pages with the source instead of assuming that every flattening mode preserves the same properties.
2. PDF24’s online flattening tool
PDF24 describes combining changeable form elements with page content. Select the PDF, start the process and download the flattened copy. Its website makes clear that this tool processes files on PDF24 servers.
Check the appearance of entered values, checkboxes and other required content. A field becoming non-interactive does not prove that its visible value was included correctly.
3. Smallpdf’s online flattening tool
Smallpdf provides another online flattening workflow. Select the source, follow the options presented by the service and download the finished PDF. Review current free-use and account conditions before relying on it for repeated work.
Test the saved result in a viewer suitable for the recipient. Confirm the actual effect on fields, text selection and page appearance rather than assuming that this service behaves identically to the other two.
Decide whether uploading is appropriate
All three methods above send the document to an online service. Review the selected service’s processing terms and your document-handling requirements before uploading. If the document must stay on your computer, choose a documented local flattening workflow instead.
Review the result and retain the source
Compare page count, orientation and visible form values.
Check small text and any image-based output.
Confirm whether fields still accept input.
Keep an editable original if further changes may be needed.
Flattening is not redaction, encryption or a guarantee that nobody can change the content. Do not use it as proof of authenticity or assume that it preserves a digital signature’s validity. If a recipient requires a particular signing or submission workflow, follow that requirement. See the PDF guides for related document tasks.
Questions about LeoPDF?
Contact xuehui@leopdf.com with your platform, app version and a description of your question.
Choose between sending a PDF to Kindle and converting it to EPUB before using Amazon’s document service.
Before converting a PDF for Kindle reading, decide whether you want to keep the page layout or try an ebook-style document. A report with wide tables and a text-heavy book can need different approaches. Keep the source PDF so you can compare the reading result.
Option 1: send the PDF itself
Amazon’s Send to Kindle service accepts PDF input. Use an appropriate Amazon account, review the options available for your document and send a file you are allowed to use. Amazon lists supported formats in its Kindle document-transfer help and links to the Send to Kindle service.
This is an upload to Amazon. Check the current service requirements and your device’s reading result. Keeping a PDF as pages can be useful for diagrams or a precise layout, but small text may be difficult to read on a smaller display.
Option 2: create an EPUB first
LeoPDFree for Windows supports PDF-to-EPUB conversion for free. Processing runs locally on your computer without uploading the PDF for that conversion. LeoPDF store editions also perform this supported conversion locally.
Choose PDF-to-EPUB conversion in your installed app.
Add the PDF and review the offered settings.
Save the EPUB and inspect it in an appropriate reading application.
If the result suits your document, use Send to Kindle to submit the EPUB.
Amazon lists EPUB as a supported Send to Kindle input format. That service step is separate from the local conversion and uploads the output to Amazon; it should not be described as an entirely offline workflow.
Try the reading controls available on your intended device.
Compare any missing or uncertain text with the PDF.
Converting a scanned page into an EPUB does not by itself promise recognized, editable text. LeoPDFree has no OCR; paid cloud OCR conversion in store editions applies to Word or Excel. Do not assume that a format change repairs a poor scan.
If the EPUB is awkward to read, compare it with the PDF version rather than assuming that conversion is always an improvement. This guide covers personal document reading, not publishing an ebook through a store.
Questions about LeoPDF?
Contact xuehui@leopdf.com with your platform, app version and a description of your question.
Use a converter that explicitly accepts XPS input when a recipient needs PDF. Renaming an XPS file does not change its format. Keep the source, save to a different output
Use a converter that explicitly accepts XPS input when a recipient needs PDF. Renaming an XPS file does not change its format. Keep the source, save to a different output file and review the conversion before relying on it for sharing or printing.
Choose local or online processing
A local tool can avoid uploading the document, while an online service can provide a browser-based workflow without installing a converter. Choose according to your document-handling requirements and the software available on your computer. Neither approach can help with identical output for every source.
Local option for command-line users: MuPDF
MuPDF supports XPS documents. Its mutool convert documentation describes converting documents and selecting PDF output through the output filename. If a suitable MuPDF command-line package is installed, an example is:
mutool convert -o “output.pdf” “input.xps”
Run it in a folder containing the source, using your actual input name and a new output name. The example does not select a restricted page range. Check your installed version’s help and official packaging instructions if the command is unavailable; do not download a random executable merely because it has the same name.
This is an option for readers comfortable with command-line tools on their platform, not a claim that Windows or macOS includes mutool by default. Keep the original and inspect the output even if the command completes successfully.
Browser option: CloudConvert
CloudConvert’s XPS-to-PDF page provides an online route. Select the XPS file, confirm PDF as the output, start conversion and download the completed document. Review the current account, file and usage conditions before starting.
This workflow uploads the document to CloudConvert. Review the service’s processing terms and whether the upload is appropriate for its contents. A browser interface should not be mistaken for a local-only operation.
Check what reached the PDF
Compare page count, order, dimensions and orientation.
Inspect small text, diagrams and unusual symbols.
Compare line breaks, tables and content near page edges.
Test any navigation or selectable text you need.
If an important element changes, retain the source and try another documented conversion route or ask its author for a PDF export. For a more detailed review checklist, see checking XPS-to-PDF formatting. Do not infer XPS input support from an unrelated PDF converter’s name or feature list.
Check geometry as well as appearance
For technical drawings or documents printed at an exact scale, compare page dimensions and print scaling separately. Matching a thumbnail is insufficient. Inspect thin lines, symbols, table borders and content near page edges at comparable zoom settings.
Test any text selection, search or navigation links you need. If the conversion fails a requirement, record the page and element, keep the XPS source and request a PDF export from its authoring application where possible.
Questions about LeoPDF?
Contact xuehui@leopdf.com with your platform, app version and a description of your question.
Your privacy choices
Optional analytics help us understand visits and download clicks. We load Google Analytics only if you accept. You can reject analytics and still use the website.